Stocktake Guide
A practical, step-by-step guide to planning, executing, and finalising a stocktake using EM Cloud and EM Omnia. This documentation is designed to support all roles involved—from preparation through to validation and finalisation—using quick guides, checklists, and detailed instructions to ensure accurate and efficient stocktakes.
- 3-Minute Overview
- Quick Guide (End-to-End)
- Checklists
- Pre-Stocktake Checklist
- Setup Checklist
- Counting Checklist (PDE)
- Validation Checklist
- Finalisation Checklist
- Execution
- Validation & Adjustments
- Finalise Stocktake
- Stocktake Best Practices
- Troubleshooting & Common Mistakes
- Reset Uncounted Items to 0
3-Minute Overview
⏱️ Time: 3 minutes
👤 Who: Store Manager / New staff (first exposure) / Anyone needing a high-level understanding
What is a Stocktake?
A stocktake ensures your system reflects the actual physical stock in your store. It directly impacts:
- Ordering accuracy
- Stock valuation
- Reporting reliability
The 5 Phases of a Successful Stocktake
1. Preparation (Critical)
Before counting anything:
- Clean up stock data
- Fix errors (negative stock, false zero stock)
- Ensure store layout (sections) is clear
- Do not re-zero stock on hand!
Most stocktake failures happen here—not during counting.
2. Setup
- Create ONE stocktake
- Set the correct date
- Ensure structure is clean and consistent
3. Counting (Execution)
- Use PDE devices to scan and count
- Each count is saved as an “input”
- Inputs must be clearly named and assigned to sections
4. Validation
- Run reports
- Identify unusual values
- Investigate discrepancies
5. Finalisation
- Close stocktake
- Set stock counts
- Update system
Biggest Risks to Avoid
- Multiple stocktakes → reporting becomes unusable
- Poor naming → investigations become impossible
- Skipping preparation → inaccurate results
- Not validating → major stock errors
Golden Rule
A smooth stocktake is built before the first item is counted
Quick Guide (End-to-End)
⏱️ Time: 5–10 minutes
👤 Who: Experienced users / Team leaders running stocktake / Anyone needing a quick refresher
Step 1: Prepare
- Run Stock On Hand report
- Fix:
- Negative stock
- False out-of-stocks
- Create clear sections
Step 2: Create Stocktake
- Stocktakes → Create
- Enter name + correct date
- Save
Step 3: Count Stock
- Inventory → Stocktake (PDE)
- Select stocktake
- Create input:
- Name (Dept + Person)
- Assign section
- Scan items and enter quantities
- Press Add on final item
Step 4: Validate
- Input Report → check entries
- Valuation Summary → check totals
- Valuation Detail → investigate issues
- Variance Report → compare results
Step 5: Fix Errors
- Use Manual Inputs
- Adjust incorrect quantities
Step 6: Finalise
- Close stocktake
- Set stock count
Checklists
⏱️ Time to Complete: 15–90 minutes (varies by store condition)
👤 Who this is for:
- Store Managers
- Inventory Controllers
- Department Managers
- Team leader setting up stocktake
- All staff using PDE devices
- Casual/counting team
Pre-Stocktake Checklist
- Sections created and clearly named
- Store mapped logically
- Stock On Hand report reviewed
- Negative stock investigated
- Out-of-stocks verified
- Departments checked for accuracy
Setup Checklist
- Stocktake created
- Correct date set
- Only ONE stocktake exists
- Naming conventions agreed
Counting Checklist (PDE)
- Correct stocktake selected
- Input named clearly (Dept + Person)
- Section selected correctly
- Products scanned accurately
- “Add” pressed on final item
- No duplicate counting
Validation Checklist
- Input report reviewed
- Valuation summary checked
- High-value discrepancies flagged
- High/low quantity errors checked
- Reports filtered by department if needed
Finalisation Checklist
- All inputs completed
- Manual corrections applied
- Reports reviewed for errors
- Stocktake closed
- Stock count set
Execution
⏱️ Time to Complete: 1–4 weeks (done progressively)
👤 Who this is for:
- Store Manager
- Inventory Controller
- Department Managers
- All counting staff
- Casual workers
👉 This is not a single task—it's ongoing preparation work.
Prepare for Stocktake
-
Why Preparation Matters
Preparation ensures your system is already close to correct before counting begins.
1. Create Sections (Store Mapping)
- Go to:
Stocktakes → Sections - Create sections that reflect physical areas
Good Example:
- “Back Room – Drinks”
- “Front Aisle 1 – Grocery”
Clear section naming allows easy recounts and investigations.
2. Check Stock On Hand
- Reports → Stock → Stock On Hand
- Run report
Look for:
- Departments with unrealistic totals
- Obvious errors
3. Check Out-of-Stocks
- Filter for stock = 0
Fix:
- Items that are actually in stock
- Remove or deactivate unused lines
4. Check Negative Stock
- Filter for stock < 0
Fix:
- Missing invoices
- Incorrect tracking settings
- Products stuck “on order”
Outcome of Preparation
You should now have:
- Clean data
- Clear store layout
- Confidence in starting stocktake
- Go to:
Create & Structure Stocktake
-
Create Stocktake
- Go to:
Stocktakes → Create - Enter:
- Name
- Correct date
⚠️ The date must match the actual stocktake date.
Structure Rules (Critical)
- Only ONE stocktake per store
- All inputs must exist inside it
Each input must:
- Represent one count
- Have a section
- Have a clear name
Naming Inputs Properly
Use:
Department + PersonExamples:
- Grocery – John
- Dairy – Sarah
This makes investigations fast and accurate.
Common Mistakes to Avoid
- Creating multiple stocktakes
- Using vague input names
- Mixing sections incorrectly
- Go to:
Count Stock (PDE Guide)
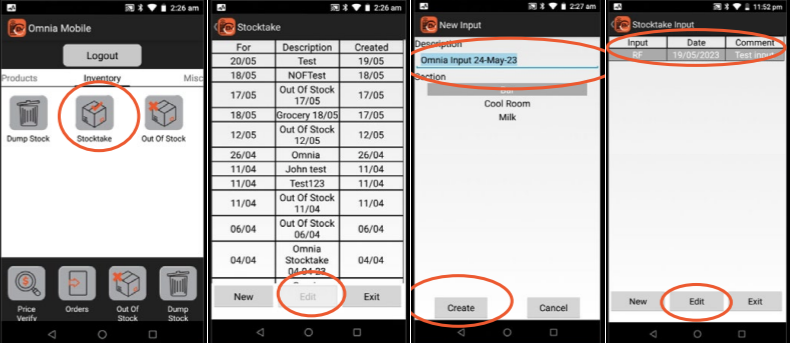
Create an Input
- Login → Inventory → Stocktake
- Select stocktake → Edit
- Create input:
- Name
- Section
Counting Process
- Scan product
- Enter quantity
- Press Add
Optional:
- Scan location before product
Important Rules
- Always press Add on final item
- Do not double count areas
- Ensure correct section is selected
Reviewing Counts
- Press back
- Review scanned items
- Edit if needed
Common Issues
-
- Missing last item (forgot to press Add)
- Incorrect quantities entered
- Wrong section used
Validation & Adjustments
⏱️ Time to Complete: 30–120 minutes
👤 Who this is for:
- Store Manager
- Inventory Controller
- Senior staff only
👉 This requires experience and judgement.
Validate Your Stocktake (Reports)
Why Validation Matters
Even well-run stocktakes contain errors. Reports help you find and fix them.
Input Report
Use to:
- Review what was entered
- Verify individual counts
Stock Valuation Summary
Use to:
- Check totals by department
- Identify major discrepancies
Stock Valuation Detail
Use to:
- Investigate individual products
- Identify incorrect quantities or pricing
Variance Report
Use to:
- Compare system vs counted stock
- Highlight differences
How to Validate Effectively
- Start with valuation summary
- Identify unusual departments
- Drill into detail report
- Confirm errors
Fix Errors (Manual Inputs & Adjustments)
When to Fix Errors
After validation highlights issues:
- Incorrect totals
- Missing stock
- Keying mistakes
Adding Manual Inputs
- Open stocktake
- Select Add Input
- Assign section and comment
- Add product and quantity
Adjusting Existing Totals
- Go to products tab
- Search item
- Edit quantity
Tips for Accuracy
- Use product codes (APN) when searching
- Double-check final totals
- Avoid unnecessary manual changes
Common Errors
- Large incorrect quantities (e.g. 99999)
- Small keying mistakes (1 vs 11)
Finalise Stocktake
⏱️ Time: 10–15 minutes
👤 Who: Store Manager only / Authorised personnel only
Step 1: Close Stocktake
- Stops further input
- Must be done before finalising
Step 2: Review Before Finalising
Ensure:
- All inputs complete
- Reports reviewed
- Errors corrected
Step 3: Set Stock Count
- Applies final counts to system
Options:
- Leave inventory unchanged
- Turn inventory on
- Turn inventory + auto order on
Important Notes
- This step updates your system permanently
- Errors at this stage will impact stock and ordering
Best Practice
Only set stock count when you are confident in your results
Stocktake Best Practices
⏱️ Time: 5–10 minutes
👤 Who: All staff involved in stocktake / Especially useful for training
Naming Matters
- Always use clear, consistent naming
- Include department and person
Section Quality
- Sections should reflect real store layout
- Must allow easy re-checking
High–Low Investigation Method
- Run valuation detail report
- Sort by quantity
Check:
- Highest values → detect major errors
- Lowest values → detect small mistakes
Ongoing Improvement
- Run reports regularly (not just at stocktake)
- Keep stock clean throughout the year
Troubleshooting & Common Mistakes
Most Common Issues
- Multiple stocktakes created
- Poor section naming
- Forgotten “Add” on last item
- Large incorrect quantities
- Skipping validation
- Poor preparation
How to Avoid Them
- Follow checklists
- Use consistent naming
- Validate thoroughly
- Train users before stocktake
Reset Uncounted Items to 0
Sometimes you will want to set uncounted products in a department, shelf location or even the whole store to 0. This can be done using Global Update AFTER setting your counts fromt he Stock Take.
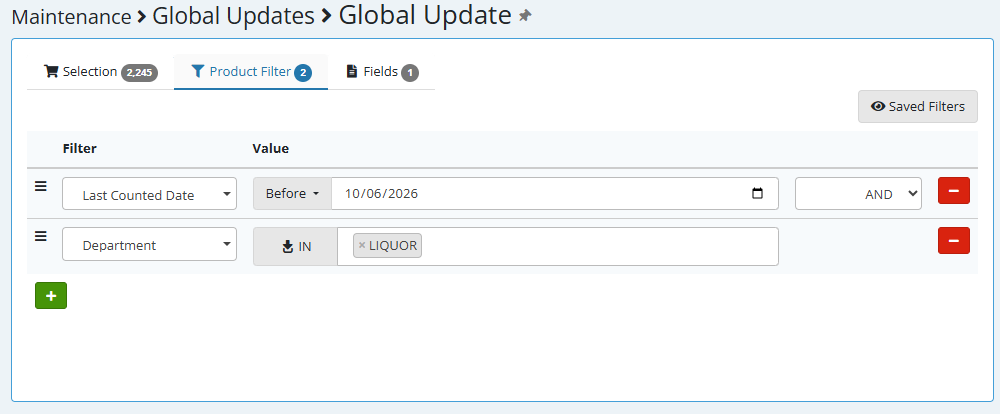
- Go to Global Update from the main menu
- Click the Stores button and select your store from the list.
- Click on the Product FIlter tab and set your filters
- Make sure to include the the "Last Counted Date" + "Before" + [Date Of Stocktake] filter
- You can set additional filters like "Department", "Shelf Location", "Supplier"
- Click on the Product Selection Tab and then click the search button. This will show you all products that will be affected by the update. Review the list carefully
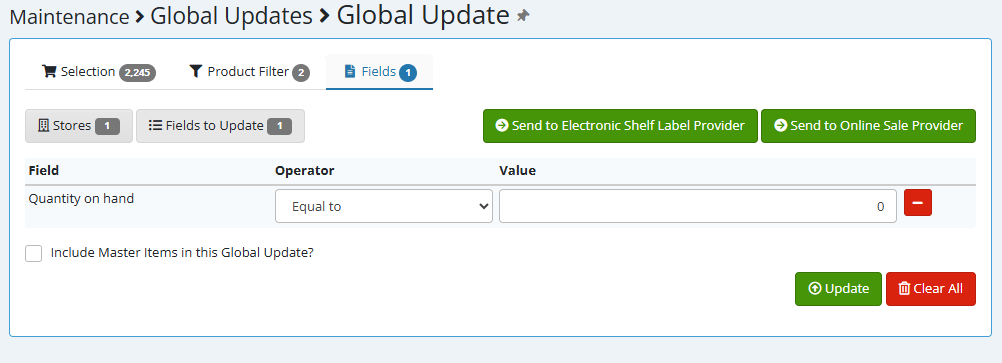
- Click on the Fields to Update button and then select "Inventory - Quantity on hand"
- Close the FIelds to update menu and you will see the Quantity on hand on the screen. set the value to 0
- Click the Update button to begin the global update.